Waychel

发现一个新世界


  • 首页

  • 关于

  • 归档

New XAMPP security concept

发表于 2014-05-06

Xampp安装完成之后,远程访问出现:

New XAMPP security concept:
Access to the requested object is only available from the local network.
This setting can be configured in the file “httpd-xampp.conf”.

解决方法:打开httpd-xampp.conf(/opt/lampp/etc/extra/httpd-xampp.conf)
注释 # require localhost

搭载Ghost博客平台

发表于 2014-05-06

###以Ubuntu作服务器:

####一、安装Node.js
1.首先下载Node.js,SSH远程登录成功之后输入:wget http://nodejs.org/dist/v0.10.28/node-v0.10.28-linux-x64.tar.gz
(下载地址可以访问http://nodejs.org/ 获得)

2.解压下载包:tar -xzf 压缩包名
3.将解压出来的文件夹移动到opt目录下:mv 文件夹名 /opt/
4.环境变量配置:
1)vim /etc/profile
键入:export PATH="/opt/node-v0.10.28-linux-x64/bin:$PATH"
然后保存退出(:wq)

2)source /etc/profile 使其生效
3)分别输入执行node -v和npm -v

出现版本号,表示Node.js安装成功。

####二、安装Ghost
1.下载Ghost:
curl -L https://ghost.org/zip/ghost-latest.zip -o ghost.zip
2.将其解压:unzip -uo ghost.zip -d ghost
3.转至解压的目录:cd /你的 Ghost 解压目录
4.npm install --production 将自动下载安装对应的模块,目录下将多出node_modules文件夹
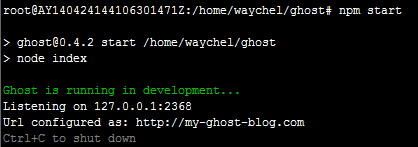
5.npm start Ghost 将会运行在 127.0.0.1:2368

6.继续在该目录下:npm install forever -g(让nodejs应用可以在后台一直执行)(了解更多可访问:https://github.com/nodejitsu/forever)

####配置Ghost域名
1.安装Nginx:apt-get install nginx将自动下载并安装
2.启动:service nginx start
3.配置你的站点:
1)在 /etc/nginx/sites-available创建一个ghost.conf文件
2)使用文本编辑器打开这个文件(e.g. vim /etc/nginx/sites-available/ghost.conf)把以下内容复制进这个文件

 server {
listen 80;
server_name example.com;

    location / {
        proxy_set_header   X-Real-IP $remote_addr;
        proxy_set_header   Host      $http_host;
        proxy_pass         http://127.0.0.1:2368;
    }
} </code></pre>

将 server_name 的值改为你的域名

3)把你的配置文件软链接到 sites-enabled 文件夹下:
ln -s /etc/nginx/sites-available/ghost.conf /etc/nginx/sites-enabled/ghost.conf

4)重启 nginxservice nginx restart


(获取更多:http://docs.ghost.org)

onStartCommand(Intent,int,int)方法返回值的作用

发表于 2014-05-05

Android开发的过程中,每次调用startService(Intent)的时候,都会调用该Service对象的onStartCommand(Intent,int,int)方法,然后在onStartCommand方法中做一些处理。然后我们注意到这个函数有一个int的返回值,这篇文章就是简单地讲讲int返回值的作用。
从Android官方文档中,我们知道onStartCommand有4种返回值:

START_STICKY:如果service进程被kill掉,保留service的状态为开始状态,但不保留递送的intent对象。随后系统会尝试重新创建service,由于服务状态为开始状态,所以创建服务后一定会调用onStartCommand(Intent,int,int)方法。如果在此期间没有任何启动命令被传递到service,那么参数Intent将为null。

START_NOT_STICKY:“非粘性的”。使用这个返回值时,如果在执行完onStartCommand后,服务被异常kill掉,系统不会自动重启该服务。

START_REDELIVER_INTENT:重传Intent。使用这个返回值时,如果在执行完onStartCommand后,服务被异常kill掉,系统会自动重启该服务,并将Intent的值传入。

START_STICKY_COMPATIBILITY:START_STICKY的兼容版本,但不保证服务被kill后一定能重启。

Android Activity生命周期

发表于 2014-05-05

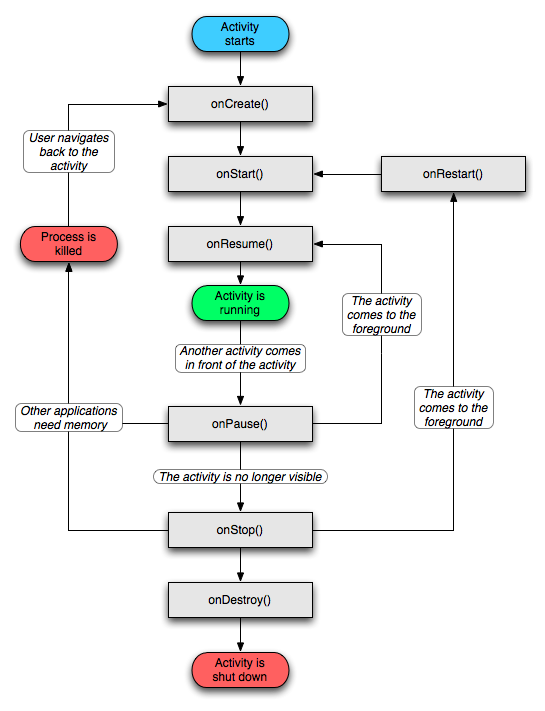
(图片来自网络)

1.App启动,onCreate()-> onStart()-> onResume()。
2.当前activity(MainActivity)正在运行中,当有另外一个activity被启动并运行时(Another activity comes into the foreground.),比如通过startActivity启动SecondActivity,SecondActivity则成为ui视图的最顶 层,此时进入onPause(),如果此时按下back键,则返回到MainActivity的onResume();
    当SecondActivity完成挡住MainActivity时或在MainActivity按下Home键(the activity is no longer visiable.MainActivity进入到onStop(),如果此时按下back键,则会onRestart()。
3.当MainActivity处于onPause()和onStop()状态时,当更高优先级的apps需要内存,而此时系统内存不够了,那么系统就会将MainActivity所在的进程杀死以释放资源。再次打开该App时,生命周期从onCreate()重新开始。

使用Android Studio可能会遇到的问题

发表于 2014-04-30

Error:Execution failed for task ‘:app:processDebugManifest’. > Manifest merger failed : uses-sdk:minSdkVersion 8 cannot be smaller than version L declared in library com.android.support:support-v4:21.0.0-rc1

解决方式:
1、Change compile ‘com.android.support:support-v4:+’ to compile ‘com.android.support:support-v4:20.+’ in build.gradle. This will prevent gradle from using v4:21.0.0 that requires version L.
2、Remove/Comment 21.0.0-rc1 in your file <android-sdk>/extras/android/m2repository/com/android/support-v4/maven-metadata.xml

Failed to import Gradle project: Could not fetch model of type ‘IdeaProject’ using Gradle distribution ‘http://services.gradle.org/distributions/gradle-1.6-bin.zip'.

解决方法:先从网页上将其下载下来,然后将其解压到任何位置,在环境变量path下配置路径(到gradle的bin目录),可通过cmd命令 gradle -v验证是否成功。

“Could not find any version that matches com.android.support:support-v4:13.0.+”

解决方法:通过SDK Manage 安装Android Support Repository

Connection to https://dl-ssl.google.com refused

解决方法:找到C:\WINDOWS\system32\drivers\etc中的hosts文件,添加 74.125.237.1 dl-ssl.google.com保存退出

通过菜单help->install update ,无法更新 Android Studio

解决办法:找到其目录下bin-studio.exe.vmoptions,添加:
-Didea.updates.url=https://dl.google.com/android/studio/patches/updates.xml -Didea.patches.url=https://dl.google.com/android/studio/patches/

错误:svn: E175002: handshake alert: unrecognized_name

解决方法:在Studio程序bin文件夹下的studio.vmoptions添加
-Dsvnkit.http.sslProtocols=SSLv3

-Djsse.enableSNIExtension=false

Manifest merging failed

解决方法:在build.gradle文件中 将AndroidMainfest.xml对应的版本号,版本名补充完整

1…678
Waychel

Waychel

关注互联网、物联网、创业、产品、技术

36 日志
9 标签
© 2014 - 2022 Waychel
粤ICP备14032841号-1